If you’ve ever started a blog, company newsletter, or YouTube channel, you’ve probably realized quite quickly that the process of planning, creating, and coordinating that content can feel overwhelming.
But it doesn’t have to be. Here’s how we’ve streamlined that process so we now have more peace of mind as we work.
The Benefits of a Consistent Content Calendar
Starting a blog, YouTube Channel, or even a company newsletter can be exciting at first. It’s a new way to get your brand out there and connect with your customers. You want to keep them informed and you’re committed to sticking to a schedule of posting and/or sharing content.
The Challenge of a Consistent Content Calendar
When I started managing our company blog and newsletter about 5 years ago, the process was a bit ad hoc but it worked… for a while anyway. Eventually, we started to create more content, had multiple writers to coordinate and content to keep track of, and on top of it, I got more responsibilities. Planning the content, staying on top of due dates (while being flexible enough to rearrange plans when they bumped up against real life) was beginning to feel overwhelming. On top of it, other responsibilities mounted so managing the blog and newsletter was just a small portion of my job. It got to a point where I felt I had no idea what was going on or what to focus on first.
We used to be very reactive in our content calendar. I didn’t plan very far ahead so every week felt very reactionary and stressful. What topic should I write about this week? What news do I need to share with customers this week? Is the customer newsletter going out this week or next week? Is the artwork for the blog ready to go?
I needed a better way to plan, coordinate, and stay on top of everything. So I started trying to figure out how I could manage the process better by using Daylite since Daylite has always been my second brain and place for creating organization out of chaos.
The Solution To Creating & Managing a Consistent Content Calendar
I started using Daylite more to plan and coordinate our content. I’ve made a few modifications to the process over the years by experimenting and tweaking what didn’t quite work. So far things have been much smoother and more manageable. I now have more time to breathe, more mental bandwidth to come up with creative ideas, more control over what’s going on, and less stress when I need to move things around. I no longer worry about things slipping through the cracks.
Our Workflow That Streamlines The Process
Planning Content
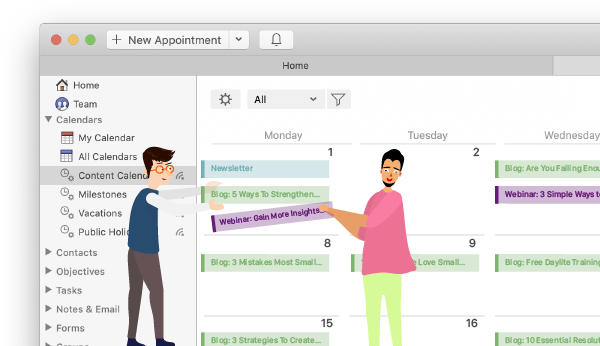
We create all-day appointments in Daylite for each piece of content – whether it’s a blog post, email campaign, or webinar. We use a recurring appointment for the newsletter that’s set to repeat once a month so I don’t have to manually create it each month. We also set repeating appointments for the blog twice every week. I then edit the appointment with the title of the post and a few point form notes in the details of the appointment for what to write about.
Daylite Tip: When working with repeating appointments in Daylite, if you try to edit the appointment or link a document, Daylite will ask you if you want this change to all appointments, or just the current one. In the case of managing our content calendar, I choose to only edit that specific appointment, and only attach the file/note/task to that specific appointment. Otherwise you’ll have that change on all future repeating appointments.
Colour-Coding The Calendar
Using Daylite Categories, we can assign each appointment a different colour. For example, the appointment category “Blog” is green and the appointment category “Email Blast” is blue. This way I can visually see from the month view in Daylite what’s coming up. It’s very easy to digest what’s in the calendar because it’s colour-coded.
Sharing The Content Calendar
Using the All Calendars tab, we created a filtered view of the calendar to just show appointments that match the category of blog, email blast, webinar, etc. We then saved that as a Smart List called “Content Calendar” and shared it with the whole company. This way we have a clean view of just the content calendar and nothing else. Anyone can check this calendar view and get an update on what’s coming up and what’s been published. I use this calendar view in every Monday weekly meeting to make sure we’re on track and start planning content ahead of time. For more on how we manage our weekly meetings, check out our blog post How To Master The Weekly Meeting.
Coordinating Work
From each blog or email blast appointment in Daylite, I create a linked task for the artwork needed and delegate it to our graphic designer. I assign the due date the day before so we have time to tweak if needed. And I mark “notify me when completed” so I get a notification in Daylite when it’s done. Our graphic designer attaches a copy of the artwork to the Daylite task so everything is in one place. I can download the artwork and add it to the blog post or email without having to pass around emails or message her on Slack. I should also mention that I’m in Canada and she’s in Chile, so all of this happens seamlessly while we’re in different parts of the world.
Tip: To learn how to delegate work in Daylite and stay on top of when it’s done, check out this article. And to learn how to add files and documents to projects, check out this tutorial.
Staying On Top of Publishing
Because I’m linked to the all-day appointment for a blog or email blast, that appointment shows up at the very top of my calendar on the Home Screen. I always start my day on the Home Screen of Daylite so I have that reminder of what needs to be published that day.
Tip: To learn how to use the Home Screen in Daylite as your daily dashboard to prioritize your day and stay on top of everything, check out this article.
Updating The Calendar
Often times what’s planned for a day changes. New priorities come up, or something happens that causes a delay and I need to swap publishing dates. Since the all-day appointments in the Daylite calendar can be moved via drag and drop, if I need to move a blog post or email blast campaign around, I just drag and drop the appointment. This makes it easy to move things around while still visually seeing where there are gaps in the calendar.
Conclusion
Overall planning, creating, and publishing content is much smoother now with this streamlined process in Daylite. Our teams have a better way to coordinate, delegate, and get updates on work. We can stay updated on what’s been published and what’s coming up. Collaborating and sharing work is smoother because I can delegate tasks ahead of time and assign content without having to phone, meet, or email the team and I can get updates when things are done.
I hope this is helpful for others struggling to manage a content calendar. Try out this workflow and let us know how it works for you.
For more Daylite workflows and best practices, follow us on Facebook for our Tuesday Tips 🙂